A hearing aid wax trap is a small filter that fits on the receiver port (speaker) of a hearing aid. Its job is to allow sound to pass through it but stop any ear wax, dust, or other debris from getting inside of the hearing aid.
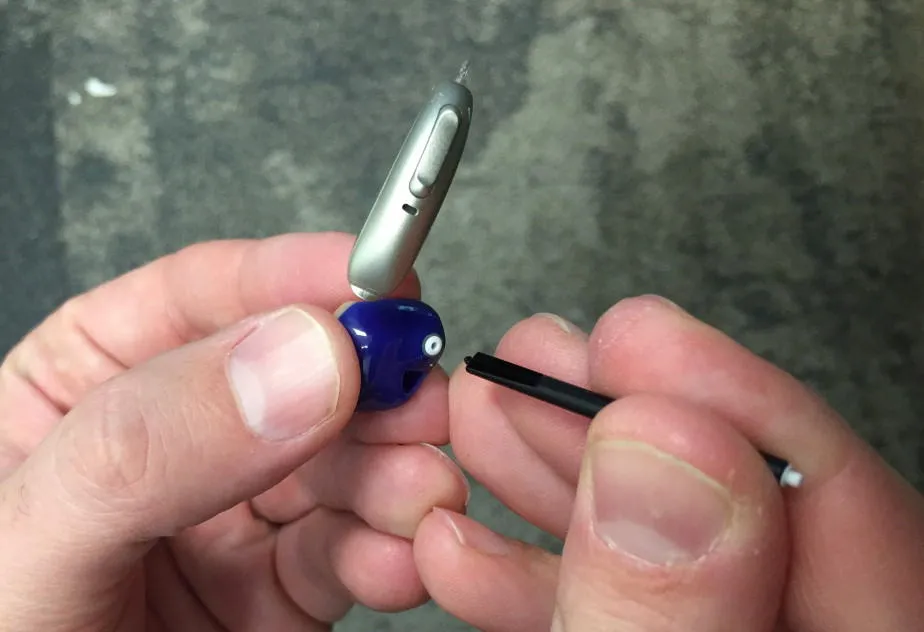
Basic Steps to Change a Wax Trap
(See below for manufacturer-specific information.)
- Take a new wax trap stick and push the blank side into the old wax trap that you want to remove.
- Pull out the stick; the old wax trap will come with it.
- Flip the stick around in your hand.
- Push the new wax trap into the hearing aid.
See below for manufacturer-specific information and for video tutorials.
How to Change a Phonak Cerustop Wax Trap

- Remove the dome from the hearing aid by holding the speaker in one hand and the dome earpiece in the other.
- Gently pull the dome off of the receiver wire. It should come off without much difficulty.
- Wipe any debris off the hearing aid. You can use a tissue or a lint-free cloth.
- Get a Cerustop stick from the package.
- Insert the removal side (the side without a white piece on it) and push it straight into the wax trap that is already in the hearing aid.
- Pull the stick out of the hearing aid; the wax trap should come with it.
- Flip the stick around in your hand so the brand-new white wax trap is facing forward.
- Push the new wax trap into the same hole of the hearing aid that the previous wax trap was removed from.
- Pull out the stick and the new wax trap should remain in the hearing aid.
- Put the dome back on the hearing aid.
If you have a custom earmold, the process is the same; you can skip steps 1, 2, and 10.
Video tutorial: https://www.youtube.com/embed/na0ShBTnJpE
Buy replacements: Cerustop Wax Traps on Amazon (affiliate).
Commonly used on: Phonak Audéo B/V/Q/Spice, Virto B/V/Q, Naída B/V/Q/S, Sky B, and CROS.
How to Change Phonak CeruShield
The newer Phonak Audéo Marvel (M) and Paradise (P) lines use a wax trap system called the CeruShield Disk. I expect these will be used on many future products.
Buy replacements: CeruShield Disks on Amazon (affiliate).
Steps

- Rotate the CeruShield disk to the right to reveal a new wax trap.

- Remove the dome from the hearing aid. Place one hand on the wire and one hand on the silicone dome and pull them apart.

- Remove the old wax trap by pushing the hearing aid into the opening labeled 1 until it clicks. Pull the wire out; the old wax trap should be removed.

- Move the wire to hole 2. Push until it clicks; the new wax trap will be inserted.

- Replace the dome (reuse if clean and in good condition; otherwise use a new dome).
Images courtesy of the Phonak Audéo M Instruction Manual.
How to Change GN ReSound Cerustop Wax Trap
GN ReSound uses the same style wax traps as Phonak, Unitron, and Widex (often called Custom/Cerustop). These are interchangeable across those brands (same factory, private-labeled).
Video tutorial: https://www.youtube.com/embed/1n9l6HQPlew
For changing the ReSound Cerustop white wax filters, follow the same steps as above for Phonak Cerustop. If you need replacements, here’s a convenient option: ReSound Cerustop Wax Filters on Amazon (affiliate).
Quick refresher:
• Insert the removal (blank) end of the stick into the used wax guard until it “grabs.”
• Pull out to remove the old guard.
• Flip the stick and push the new white filter straight into the opening; pull the stick away to leave the new filter in place.
How to Change Starkey Hear Clear Wax Trap
Similar to other wax traps, Starkey uses a disposable stick to insert and remove the filter. Sticks have been orange (twist-in), then black, and now yellow (press-in) in 8-packs.
Video tutorial: https://www.youtube.com/embed/00xxPZecapA
Steps to Change the Hear Clear Wax Protection Filter (Starkey)
- Insert the empty end of the yellow Hear Clear stick into the old wax guard.
Note: Yellow/black sticks do not need to be twisted; the original orange sticks screw in. - Pull the stick out to remove the used guard.
- Press the new filter (opposite end of the stick) firmly into the same opening.
- Pull the stick out and discard it. (Single-use only.)
Buy replacements: Hear Clear Filters on Amazon (affiliate).
How to Change Oticon ProWax & ProWax MiniFit Wax Guards
Oticon uses two similar wax traps: ProWax and ProWax MiniFit. They differ in diameter and are not interchangeable.
- Generally, dome tips use ProWax MiniFit.
- Custom earmolds often use ProWax.
- Oticon sometimes varies this by ear canal shape/product, so if you’re unsure, you may need to guess.
Video tutorial: https://www.youtube.com/embed/shwTJ8jjx78


Steps
- Remove a new applicator tool from its package.
- Push the side without a white wax trap into the used filter on your hearing aid.
- Pull out; the old filter should be attached.
- Move the applicator to the new ProWax, line up with the receiver port, and push in.
- Remove the applicator and discard it.
Buy replacements:
- Oticon ProWax (affiliate)
- ProWax MiniFit (affiliate)
Images courtesy of Oticon user manuals.
Why Is the Wax Trap Important?
A wax trap (also called a wax guard or wax filter) keeps debris out of the hearing aid receiver. Average replacement frequency is every 2–4 weeks (or as needed). Before wax traps became standard, repairs for “dead” hearing aids due to wax blockage were far more common; now, users can often fix this quickly at home.
What Are Wax Traps Called by Each Manufacturer?
- Phonak — Cerustop; CeruShield Disk
- Unitron — Cerustop
- GN ReSound — WaxGuard/Cerustop
- Starkey — Hear Clear
- Oticon — ProWax; ProWax MiniFit; (some products refer to “WaxGuard”)
- Signia (Siemens) — C-Grid, HF4 Pro (Red/Blue), WaxGuard Mini RIC
- Widex — Cerustop XL, Cerustop Nano
- Beltone — Same ecosystem as Signia for many models
- Bernafon — Uses Oticon line
Related Reading on OTC Aids
- Complete OTC Hearing Aid Guide
- Eargo — often uses HF5 Pro-style guards (see your device guide).
- Lexie — If you’re using Lexie/Bose OTC models, see: Troubleshoot Common Problems with Lexie B2 by Bose
How to Change a Wax Trap (General Pattern)
All manufacturers use a very similar system:
- The tool has two ends:
- a barbed/blank end to remove the old filter, and
- a new white filter on the other end to insert.
- Insert the removal end into the old filter until it connects, then pull out.
- Flip the stick and press the new filter in.
- Discard the tool.
If you struggle due to vision or dexterity issues, ask for help or see: Tips for Hearing Aids and Hand Tremors.
Optional resource for professional fittings: If you’re exploring professionally fit devices and local pricing, you can check partners like ZipHearing.